
Thursday, January 17, 2013
Figure Drawing: Progressive Self Portrait
In my class we drew self portraits every weekend using a variety of media. This was my favorite one. It shows my image as it might appear at the ages of 20, 40, 60 and 80. There are various things in the background that might contribute to such appearances. It is pastel on 18 x 24 inch white drawing paper.

Figure Drawing: Sustained Gesture Drawings
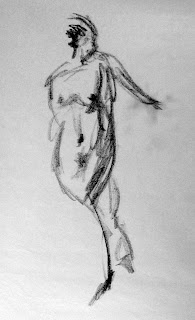
A sustained gesture drawing is one in which the model holds the pose for a longer period of time and students are to draw as in a rapid gesture drawing. The extra time allows students to provide more detail. For this sustained gesture drawing students drew for five minutes then two things happened. The professor asked students to use a hand and smear all the charcoal in the drawing they had finished. Second, the model was asked to change his pose. Students were given five more minutes to finish the drawing on the same piece of paper. I think this one came out particularly well. It is charcoal on newsprint.
10 minute drawing with smearing and double pose:

10 minute drawing with smearing and double pose:

Figure Drawing: Mass Gesture Drawings -- Charcoal
At the beginning of each class we did a series of gesture drawings. Their purpose is to activate the student's senses and to coordinate the eye and hand. The poses are rapid, lasting a minute or less. In a mass gesture drawing, the focus is on capturing the gesture of the figure through an exploration of the figure's mass. In a charcoal drawing the mass is expressed through its volume. All of these drawings were charcoal on newsprint. I especially like this medium because of its expressive qualities.
60 second drawing:

55 second drawing:

60 second drawing:

50 second drawing:

60 second drawing:

50 second drawing:

50 second drawing:

60 second drawing:

55 second drawing:

60 second drawing:

55 second drawing:

60 second drawing:

50 second drawing:

60 second drawing:

50 second drawing:

50 second drawing:

60 second drawing:

55 second drawing:

Figure Drawing: Mass Gesture Drawings -- Vine
At the beginning of each class we did a series of rapid gesture drawings. These are designed to get the creative juices flowing while also training the eye and hand. A mass gesture drawing attempts to capture the gesture of a figure through an exploration of its mass. Often this takes the form of shadow and light. The use of vine charcoal simplifies this while also retaining some linear quality. All of these are vine charcoal on newsprint.
60 second drawing:

50 second drawing:

60 second drawing:

55 second drawing:

60 second drawing:

60 second drawing:

50 second drawing:

60 second drawing:

55 second drawing:

60 second drawing:

Wednesday, January 16, 2013
Figure Drawing: Rapid Gesture Drawings
In our figure drawing class we warmed up everyday with a series of timed gesture drawings. Some of these were very rapid, 10 second, drawings. The purpose of these drawings is to get the mind and body loose and synchronize the eye and hand. Some of them turned out well. They are all graphite on newsprint. These are my favorite ones:
15 second drawing:
10 second drawing:

15 second drawing:

20 second drawing:
 20 second drawing:

15 second drawing:

10 second drawing:

15 second drawing:

20 second drawing:


Saturday, January 5, 2013
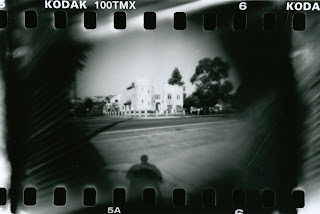
Photograph: Idaho Welcomes the World
This photograph was taken with the Wirgin Auta. I used Kodak Tri-X 120 roll film and a tripod. The aperture setting was f/8 with a shutter setting of 1/50 second for both exposures. Two exposures were taken and the film was allowed to slightly overlap. A single photograph was made from these two negatives. It was part of a project that was a response to the 1975 exhibition, "New Topographics: Photographs of a Man-Altered Landscape."

Photograph: Main Entrance
This black and white photograph was made with the Wirgin Auta. I used Kodak Tri-X 120 roll film and a tripod. The shutter speed was 1/50 second for both exposures and the aperture was set to f/11 for one and f/8 for the other, as a little time elapsed between exposures. Two exposures were used and the film was allowed to slightly overlap. A single photograph was made and was part of a project that was a response to the 1975 exhibition, "New Topographics: Photographs of a Man-Altered Landscape."

Photograph: Culvert
This black and white photograph was made with the Wirgin Auta. I used Kodak Tri-X 120 roll film. The aperture was set to f/22 and the shutter speed was 1/100 second for both exposures. Two exposures were made and the film was allowed to slightly overlap. Each negative was 4.5x6cm and a single photograph was made from them. This photograph was for a project that was a response to the 1975 exhibition, "New Topographics: Photographs of a Man-Altered Landscape."

Photography and Cameras: Wirgin Auta
This Wirgin Auta was made in Germany about 1935 or 1936. It is a folding bellows camera. The model name "auta" does not appear on the camera.

It is "auta" because when you push the button on top, the front pops open and the lens and bellows automatically slide into position so you can photograph.

It has a Vario shutter that supports shutter speeds of "T", "B", 1/25, 1/50 and 1/100 seconds. It has aperture settings of f/4.5 to f/22. The Rodenstock-Trinar lens may be focused from 4 feet to infinity. Note the demarcation on the lens: "1:4.5 f=10,5cm". This indicates that the lens was made before WWII since after the war lenses were measured in mm. The back of the camera has an interesting feature.

Internally the camera has two format masks which when present allow the user to shoot 4.5x6cm negatives. When removed, the negatives are 6x9cm. When the masks are present, to take a photograph the user advances the roll of 120 film until the appropriate number appears in the first window. After that shot is taken, the user advances the film until the same number reaches the second window. It is possible for users to advance the film too far or not far enough. This can have interesting effects. I used these effects in my final project. The Wirgin Auta has a viewfinder on top, but no rangefinder. In order to know how far away an object is, I built a rangefinder card. It is about 2x3 inches.

The numbers on the card match the focal distances on the lens. To use this card, I close my right eye and open my left eye, align the left edge of the card with the object I want to photograph, then close my left eye and open my right one. The object will now appear over the correct distance. I will post several photographs made with the Wirgin Auta.
Photograph: River Bridge
This black and white photograph was taken with the Holga 120N. I used Kodak Tri-X 120 roll film, the "cloudy" aperture setting and the "N" shutter speed. It is a little more abstract than most of my Holga photographs.


Photograph: 666
I took this black and white photograph with the Holga 120N for a project called "pretty and creepy". Each photograph was to have a pretty aspect along with a creepy one. As luck would have it, my roll of 120 Tri-X film got possessed by the devil. It ripped off part of my Holga (not uncommon enough) and tried to eat it. This caused some very strange effects to the photographs on the roll. This photo is of the Communications Building at Boise State University. It is said that the ghost of one of its former professors walks the halls at night. Looking at this photograph, I could believe it. It was taken with the "cloudy" aperture setting and the shutter set to "N".


Photograph: Lisa's Flower
This black and white photograph was taken with the Holga 120N. I used Kodak Tri-X 120 roll film at the "cloudy" aperture setting and the "N" shutter speed. The photograph shows a ceramic flower my niece made along with some grape vines. A tripod was used. Note how some of the image is in sharp focus while other parts are not. This is one of the special things that the Holga can do.


Photography and Cameras: The Holga 120N
The Holga 120N is a fantastic camera with a plastic body and lens. You may think of it as the daughter of the Diana, another fantastic camera. It is unpredictable and wonderful for experiments. It uses 120 roll film and is configurable to take either 12 square pictures or 16 rectangular ones. It has a nut on the bottom to allow it to be attached to a tripod. No two Holgas are exactly alike. Here is a picture of the Holga.

The Holga has two apertures settings: sunny (about f/10) and cloudy (about f/8). It has two shutter speeds: "B" and "N" (about 1/100 sec). "B" allows you to hold the shutter open as long as you want. The 60mm lens, which is likely to be warped, can be rotated to adjust for focus. The lens has four pictographs to indicate focal distances: "head & shoulders", "couple with child", "seven person group" and "mountain". The Holga has a viewfinder to allow you to see the image, but no rangefinder to tell you how far away it is. I built a rangefinder card to assist with this. To use it, I close my right eye and open my left eye, align the object I want to photograph with the left edge of the card, then close my left eye and open my right eye. The object will appear above the correct distance indicated on the card. Here is a picture of the Holga rangefinder card. It is about 3 inches by 2 inches.

Some of you may be wondering how I made this card. First, to determine the actual focus of the lens at each pictograph, I removed the back, taped a small piece of wax paper to the focal plane and advanced the camera until an object was in focus. I noted the distance for each pictograph. I then made the card using the open eye / closed eye technique. I had the card laminated at the BSU copy center. A wonderful thing about the Holga is that it uses 120 roll film and allows you to experiment inexpensively in the darkroom with medium format film. I will post several photos from the Holga.
Friday, January 4, 2013
Photograph: Walker
This black and white photograph is from a project called "Pretty and Creepy". It was taken with the Spencer Full-Vue pinhole camera using a roll of 120 size Kodak Tri-X film. The aperture is f/512 and the exposure was for 4 seconds. A tripod was used.

Photography and Cameras: Spencer Pinhole Camera
While I was working on cameras last summer I converted my Spencer Full-Vue twin lens reflex camera to a pinhole camera. The Spencer was built about 1948 and uses 120 roll film. I removed the Spencer lens and replaced it with a pinhole lens that I drilled in a brass shim. The aperture setting is f/512. The Spencer does not have a nut allowing it to be attached to a tripod, so I built a platform that matches the bottom of the Spencer and can be attached. This works very well. Here is a photo of the Spencer pinhole camera.

I use the camera on the "B" setting to control the length of time for the exposure. I used black tape on the front of the camera because it had some light leaks in it. I really like the feel of this camera. You set it waist-high on a tripod, look down through the large viewfinder and take your photograph. It works very well. I will post one photo from this camera.

I use the camera on the "B" setting to control the length of time for the exposure. I used black tape on the front of the camera because it had some light leaks in it. I really like the feel of this camera. You set it waist-high on a tripod, look down through the large viewfinder and take your photograph. It works very well. I will post one photo from this camera.
Photograph: Hemlock
Here is a photo from my professor's 120 pinhole camera. I used Kodak Tri-X 400 120 roll film. The aperture was fixed at f/512 and the exposure time was 2 seconds. I set the camera on a flat surface affixed to a tripod, but there may have been a little shake in the exposure.

Photography and Cameras: 120 Pinhole Camera
After my professor saw my 35mm pinhole camera, she loaned me hers. It was made in Germany and uses 120 roll film. Its shutter has a really nice sliding door design and has no light leaks. This is photo of the front of the camera. Notice the sliding shutter.

This is a photo of the back of the camera. The hole in the back allows you to see the film numbers as the take-up reel is turned. This tells you when to stop turning. The text on the back, "Sun = 2 sec, 400 ASA" means that the aperture is f/512 and on a sunny day, the exposure should be for 2 seconds if you are using 400 ASA/ISO film like Tri-X 400.

This was a very nice pinhole camera. I'll post one photo from it.
Photograph: Castle
This black and white photograph was part of the "Irony" project. It was taken with the 35mm pinhole camera using Kodak Tmax-100 film. The aperture is fixed at f/256 and the time was 4 seconds. The camera was mounted on a tripod. When my professor saw this photograph, she said, "You could not buy light leaks like that!" They add a lot to the irony of the subject.
Photography and Cameras: 35mm Pinhole Camera
I bought a 35mm pinhole camera kit. It said, "You can build your own pinhole camera!" I couldn't resist it. It was fun building it. All of the pieces came on a sheet (like cereal box paper) and had to be punched out. You glue and clamp them together. The lens that came with the kit had a problem so I drilled my own lens in the top of a can of beans. I drilled the hole using a number 10 sewing needle and some 600 grit sandpaper. It took a few hours to finish but worked great. The aperture of the lens is f/256. I love the fact that it must be held together with rubber bands. There is no film counter. After you take a picture, you must guess how many times to turn the take-up reel. It has a nut on the bottom for attachment to a tripod. I found that 400 ISO Tri-X film was too fast for the camera. I could not open and close the shutter fast enough so I used TMax-100 film with it. That worked.

If you look closely, you will see that the shutter could have some problems. It could let light in even when the shutter is closed. I could have used black tape over the top of the shutter, but I did not think of it at the time. I will post one photo from this camera.

If you look closely, you will see that the shutter could have some problems. It could let light in even when the shutter is closed. I could have used black tape over the top of the shutter, but I did not think of it at the time. I will post one photo from this camera.
Photograph: Fallen Flower
This black and white photograph was taken with the Rollei 35 TE. It was for a project called "Irony" and the irony is a little subtle. It may be too subtle for you to readily see. I used Kodak Tri-X film with an aperture setting of f/8 and a shutter speed of 1/500 sec. Here is the photograph. The irony is explained below.

This photograph is ironical because in this beautiful, artificial landscape with gravel, plastic flowers and the painted, iron sculpture, a single flower has blown in and is lying just below the sculpture of leaves and flowers.

This photograph is ironical because in this beautiful, artificial landscape with gravel, plastic flowers and the painted, iron sculpture, a single flower has blown in and is lying just below the sculpture of leaves and flowers.
Photography and Cameras: Rollei 35 TE
The Rollei 35 is an amazing feat of engineering. It measures 3 3/4 inches wide, 2 3/4 inches tall and 1 1/4 inches deep. The retractable lens pulls out to take a picture and can be turned back in when finished. The Rollei that I have has a Tessar 40 mm f/3.5 lens that can be focused from 3 feet to infinity. The aperture settings range from f/3.5 to f/22. Shutter speeds range from "B" to 1/500 sec. Here is a picture of the Rollei 35 TE. Notice the quarter coin to give you an idea of how small the camera is.

The incidental light meter is shown between the "Rollei" and the "35 TE". The Rollei 35 has a large, bright viewfinder but does not have a rangefinder. The user is supposed to guess how close the image is and set the camera accordingly. To make it easy for me to focus I built a rangefinder card. To use it, I close my right eye, open my left eye and align the left edge of the card to the image I want to photograph. I then close my left eye, open my right eye and see how far the image has moved. This tells me the distance to the object. The distances on the card, match the focal distances on the Tessar lens. Here is a photo of the Rollei 35 rangefinder card. I had it laminated at BSU copy services.

I'll show a photo that I took with the Rollei 35 TE.
Photograph: Empty Chairs
Here is a photograph taken with the Nikon EM. It also was a response to Robert Frank's The Americans. I used Kodak Tri-X film with an aperture setting of f/22 and a shutter speed of 1/500 second. This photograph is also from the Rose Hill neighborhood in Boise.


Photography and Cameras: Nikon EM
The Nikon EM is a smaller, lightweight, compact 35 mm single lens reflex camera. When you look through the viewfinder, you see the image that you will photograph. It was introduced in 1979 and sold for a number of years. It has a 50 mm f/1.8 lens that can focus from 2 feet to infinity. It has the following aperture settings: 1.8, 2.8, 4, 5.6, 8, 11, 16 and 22. It has through-the-lens metering and is an aperture-priority camera. The user selects the aperture setting and the camera automatically selects the shutter speed according to its meter reading. I bought it used and found that the film compartment seal was worn out so there were light leaks. Last summer I made a new seal and repaired the camera. I took a number of photos with it and will show one. Here is a picture of the Nikon EM.


Photograph: Boise Depot/Abandoned Law Office
This black and white photo is also a response to Robert Frank's The Americans. It was taken with the Kodak Signet 35 using Tri-X film. It is a double exposure. The first exposure was of a curving window in an abandoned law office in the Rose Hill neighborhood. If you look carefully, you can see the names and dates of when partners joined the firm. The second exposure was of the Boise Depot on the edge of the Rose Hill neighborhood.

Photograph: Abandoned Garage
As part of a photography project to respond to Robert Frank's book The Americans, I took this black and white photograph of an abandoned garage in the Rose Hill neighborhood of Boise. I used the Kodak Signet 35 camera with Tri-X film at an f/8 aperture setting and shutter speed of 1/100. This was one of my best photographs of the semester.


Photography and Cameras: Kodak Signet 35
In my Creative Photography class I took some interesting photos and used a number of different cameras. One of my favorite cameras is the Kodak Signet 35. It was built about 1950 and the ergonomics are exceptional: it just fits in your hand and is so easy to use. It also has some interesting features. Here is a photo of the front of the camera.
 It is a rangefinder camera. As you look through the viewfinder you see two images. As you change the focus the images come together and when they merge you know the camera is in focus. Last summer I worked on this camera and fixed the rangefinder in it. It has a Kodak Ektar 44 mm f/3.5 lens which can focus from 2 feet to infinity. The shutter is a Synchro 300 with shutter speeds of "B", 1/25, 1/50, 1/100 and 1/300 seconds. The aperture settings are 3.5, 4, 5.6, 8, 11, 16 and 22. You must cock the shutter before you can take a picture. This prevents you from accidentally taking a double exposure. (This can be overcome, as I will show.)
Here is a photo of the back of the camera.

Notice the sliding mechanism that is designed to help you decide which shutter speed and aperture setting is appropriate for the scene. It is really cool. I'll show a couple of photos that I took with the Signet 35.

Here is a photo of the back of the camera.

Notice the sliding mechanism that is designed to help you decide which shutter speed and aperture setting is appropriate for the scene. It is really cool. I'll show a couple of photos that I took with the Signet 35.
Subscribe to:
Posts (Atom)